what steering method is used to turning in to tight spaces
While learning the correct steering techniques and hand positions for different situations may seem like a elevate, information technology is of import to get into the right habits from the start of your driving journeying. One time you have fallen into bad habits, getting rid of them is extremely difficult. Failing to observe the correct techniques during your practical driving test could cost you your license.
- Positioning hands on the steering wheel
- Hand position 10 and 2
- Manus position nine and 3
- Hand position viii and iv
- Steering techniques
- Hand to hand steering – push–pull steering
- Hand over hand steering
- Ane manus steering
- Manus over hand steering and airbag injuries
Getting to grips with the various possible steering techniques begins with learning to position your hands on the steering bicycle appropriately for the immediate driving situation. When you can correctly identify the hand position you should be using, the next step volition be learning and practicing several different steering methods. These include the "manus to hand" technique (pull-push steering) and the "paw over hand" technique. One-mitt steering and stock-still input steering will likewise exist discussed, though these techniques are simply appropriate in sure situations.
 NHTSA recommends using one-hand steering only when turning while bankroll, or operating vehicle controls that require removing a hand from the steering wheel.
Positioning hands on the steering wheel
Each of the three primary hand positions listed here comes with its own advantages and disadvantages. These positions are:
- The ten and 2 position
- The 9 and 3 position
- The 8 and 4 position
These three main positions are explored in more particular beneath.
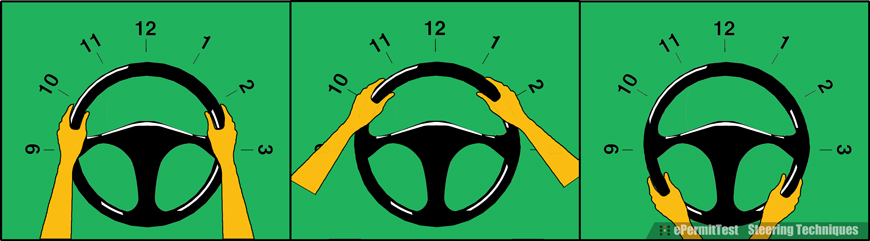
Mitt position 10 and ii
The 10 and 2 driving position is the one with which most driving students are familiar, as information technology used to be the standard recommendation made past every driving teacher. Indeed, information technology is even so recommended as an ideal hand position in many country driving handbooks and commuter's teaching programs.

However, the 10 and ii position is no longer recommended as widely as it once was. Information technology is now understood that this position can put drivers at greater run a risk of injury if their vehicle is fitted with an airbag. If the airbag is released, the driver'due south hands may be thrown back toward their face from this position. Consequently, we do not propose driving with the 10 and ii paw position if your vehicle is equipped with airbags. Certain steering techniques as well contribute to airbag-related injuries; nosotros will discuss this in greater detail further down.
Mitt position ix and three
A minor adjustment from the 10 and 2 position to the 9 and 3 position is advantageous for several reasons. This position affords a similar level of control every bit the 10 and 2 position, though with greater leverage on the steering bicycle. Plus, property the wheel in the 9 and 3 position will ensure yous exercise non injure yourself if the driver'south side airbag deploys. If you are using the stock-still input steering technique, the 9 and iii hand position should be the one you choose.

As the 9 and iii position is widely accustomed as a safer and more than constructive alternative to the traditional ten and 2 position, you volition not be penalized for using it during your practice driving exam. Fortunately, every land in America currently lists the 9 and 3 paw position as an acceptable steering wheel grip. For these reasons, nosotros believe this hand position should be the 1 you focus on while learning to drive.
Hand position 8 and four
When it comes to mitt position viii and 4, the jury is very much out. Many country's driving handbooks recommend this position every bit an culling to the ten and 2 position, when driving a vehicle fitted with airbags. Mitt position 8 and 4 has a slight advantage over 9 and 3, in that it is a more comfortable position to maintain for longer periods.

Though, the 8 and 4 position receives equally wide criticism from driving experts who are not convinced it gives drivers sufficient leverage on the steering wheel. Certainly, the 8 and 4 position does not offer the same leverage equally the 9 and three position. For this reason, it is by and large only recommended for utilize when driving on a highway or in a like state of affairs where little maneuvering is required. You may also revert to this position for a short time, if your arms become tired in the 9 and three position.
Steering techniques
In that location are two principal steering techniques that can be used in general driving situations. These are the "hand-to-hand" and "hand-over-paw" techniques. Similar hand positions, these 2 methods have their own plus-points and draw-backs.
Hand to manus steering – push button–pull steering
"Hand-to-hand" and "push-pull" refer to the aforementioned steering technique. You may also hear this method described every bit "shuffle steering". In push-pull steering, the driver feeds the steering wheel through their hands, with both arms remaining on their respective sides of the wheel. When using this technique, your easily will movement closer and farther apart just volition never cross over. If the airbag deploys, the risk of injury volition exist minimal as your hands will not be in the mode.
Hand-to-hand steering method may also be called "push/pull" steering. Using this steering method, your hands practise not cross over the face of the steering wheel, and therefore there is less chance of injury to your face, arms, or hands in the upshot of an air bag deploying.
Most drivers associate the hand-to-manus steering technique with turning slow corners, though it is also appropriate when navigating sharper curves at high speed. While the manus-over-mitt method is often recommended for sharper bends and higher speeds, the push-pull technique actually affords the driver better control in these situations. Reason being that manus-to-paw steering positions the thumbs pointing upward, offering a superior downward grip on the wheel.
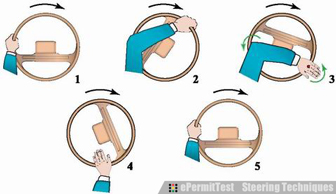
Here is how hand-to-hand steering plays out during a right turn:
-
1

When using paw-to-hand steering to execute a right plow, brainstorm by pushing your left mitt upwards until information technology reaches the 12'o clock position at the top of the bicycle. While doing this, you should allow the steering wheel to slide through your correct mitt and so that it remains in the 3'o clock position.
-
two
Side by side, firmly grasp the wheel with your right hand and continue turning information technology in a clockwise direction. At the same fourth dimension, slide your left hand anti-clockwise to the 6'o clock position. When your correct mitt meets your left paw in position 6 you may continue to move the wheel clockwise with your left hand.
-
iii
When you have finished turning, consummate these steps in reverse order to bring the steering cycle back to neutral and your hands to the 9 and three position.
Manus over manus steering
Paw-over-hand steering appears to be more efficient than push-pull steering and is favored by many drivers every bit a result. In reality, hand-over-hand steering requires more effort than hand-to-hand steering and is now considered to be non as safe. You will non be penalized for using the hand-over-hand steering technique during your driving examination, though we recommend getting used to hand-to-hand steering as early on as possible.
To make a right turn using manus-over-hand steering:
- Beginning with your hands in the ix and 3 position. Push the bike clockwise with your left hand, taking your right hand with the wheel rather than assuasive it to slide and remain in place.
- Let become of the steering wheel with your correct manus when your left reaches the one'o clock position. Cross your right hand over your left and grasp the wheel at position 11 or 12.
- Release the wheel with your left hand and proceed moving information technology clockwise with your right. Plow the wheel dorsum to neutral position when the turn is complete.

One hand steering
Most drivers assume that i-mitt steering and left-manus steering are never acceptable steering methods. In fact, they are commanded and necessary only merely during very specific driving situations.
Your driver's handbook probably recommends keeping both hands on the steering cycle at all times. While this is skilful communication, it will not work when you are backing up or attempting to parallel park.
The DMV explicitly land that drivers cannot rely solely on mirrors when reversing or parallel parking. During these maneuvers you must turn and physically look over your shoulder to see if the space behind yous is clear. Apparently, this would brand keeping both hands on the steering wheel impossible.
It is also acceptable to steer with ane mitt whenever you need to operate controls within the vehicle, such as headlights, windshield wipers, temperature controls, hazard lights or the gear stick, on cars with a manual transmission.
One-paw steering limits your control of the vehicle and is only allowable if:
- You must reverse or parallel park, as this requires you to release the cycle to look over your shoulder.
- You are using one hand to operate vehicle features necessary for safety, condolement or information.
Hand over hand steering and airbag injuries
In hand-over-hand steering, the commuter's arms volition laissez passer across the airbag deployment zone. If the airbag deploys while your hands are in the firing line, it will throw your arms dorsum into your face at roughly 200mph. For many unfortunate drivers every year, careless mitt positioning results in serious injury when the commuter's side airbag deploys. Common airbag-related injuries include:
- Forearm fractures
- Wrist fractures
- Finger and thumb fractures
- Nose and cheekbone fractures
- Facial lacerations (when the driver is wearing rings, bracelets or glasses)
 If an air bag deploys and a driver's arms are in the style, they may get broken or thrown back into the driver's face up with enough forcefulness to cause serious injuries.
Driving hand-over-hand should be avoided wherever possible, even if your vehicle is not equipped with airbags. You may 1 day bulldoze a car that does have airbags and will need to exist in good habits to go along yourself safe.
Would you pass a driving test today?
Find out with our free quiz!
TAKE A FREE Examination
mitchellpuzed1938.blogspot.com
Source: https://www.epermittest.com/drivers-education/steering-techniques
0 Response to "what steering method is used to turning in to tight spaces"
Post a Comment